Most custom carton orders that go wrong do not go wrong at the printing press. They go wrong in the file, before anything is printed, because the artwork was never built to the structure of the box. A folding carton is a flat sheet that gets cut, creased, folded, and glued, and the file you hand a printer has to describe all of that, not just carry a pretty label. Getting the specification right the first time is the difference between a clean proof and a week of back-and-forth. Here is how to spec one so it runs.
The dieline is a map, not artwork
The single most important file in a carton order is the dieline: a vector template that shows the box unfolded flat, with every cut, crease, and glue area drawn as a separate kind of line. Solid lines mark where the blade cuts the outer edge and any openings. Dashed lines mark creases, the places the board is scored so it folds cleanly. Perforation lines show tear-away features, and glue areas are called out separately so they stay free of coating and heavy ink that would stop the adhesive from bonding. The dieline is an instruction set for building the cutting die, so it is drawn to the exact finished dimensions and is not something you eyeball or scale up from a picture.
Your printed graphics sit on top of that map, and they have to extend past it. Standard bleed is 0.125 inch, or 3 mm, beyond every cut edge, so that when the blade lands slightly off-register you never get a sliver of bare board at the edge. Bleed matters on internal edges too, the flaps and tuck panels that become visible once the carton is folded, which is exactly where inexperienced files tend to stop the artwork short.
Keep type out of the danger zones
The flip side of bleed is the safe area, the interior margin where text, logos, barcodes, and any legally required panels have to live so a small shift in cutting or folding never clips them. The rule that trips people up most is creases: never place text or a barcode across a fold line. When the board bends at a score, ink on that line distorts, cracks, or breaks, and a barcode that crosses a crease can simply stop scanning. Keep the glue flaps clear of ink and coating as well, and confirm that panel sizes account for the small amount of board consumed at each crease, since a carton measured only in its flat state can end up a hair tight once it is folded around a real product.
Caliper: how thick the board should be
Board thickness is measured in caliper points, where one point equals one-thousandth of an inch. An 18-point board is 0.018 inch thick. Lighter 10-to-12-point stock suits sleeves and inserts; 14-to-16-point covers small cosmetic boxes and light retail cartons; 18-point is the common starting point for a standard retail folding carton; and 22-to-24-point is chosen for heavier boxes and supplement packaging that need to feel substantial on a shelf. Heavier board resists crushing and reads as more premium, but it costs more, adds shipping weight, and needs its creases dialed in so it folds without cracking.
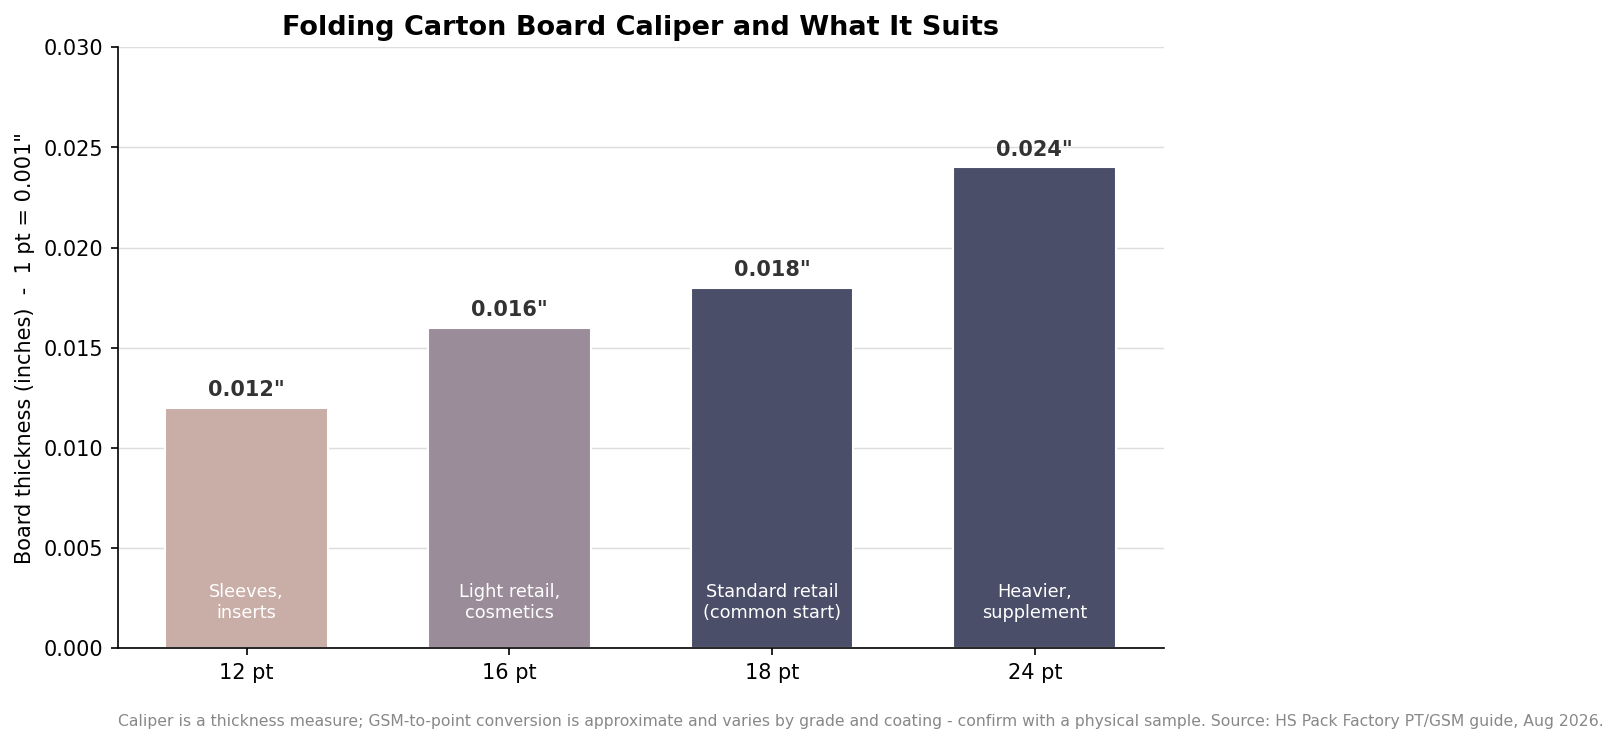
One caution when a supplier quotes a paper weight in GSM instead of points: the conversion between the two is only approximate, because actual thickness depends on the board grade, fiber density, and coating. Always confirm caliper against a physical sample rather than trusting a GSM-to-point conversion on a spec sheet.
Why the first carton costs so much
Custom cartons carry a real one-time cost before a single box ships. The cutting die and tooling typically run somewhere in the range of a few hundred to roughly fifteen hundred dollars depending on the carton’s size and complexity, with features like window cut-outs pushing toward the top of that band. Standard four-color printing plates are usually folded into the job, with extra charges only when a fifth or sixth ink is added. That fixed setup is why small runs feel so expensive per box: the tooling is spread across however many cartons you order, so a die amortized over a few hundred units adds dollars to each one, while the same die over several thousand units adds only pennies.
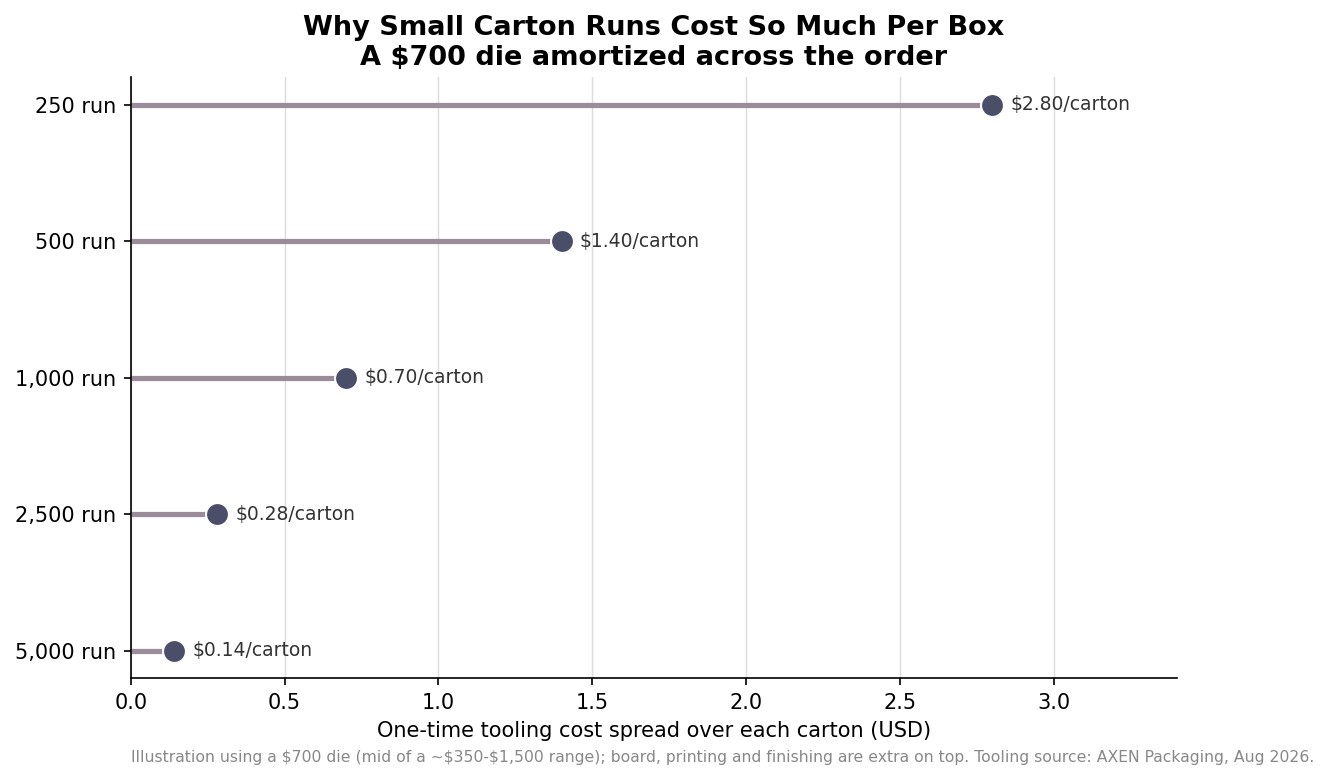
The practical lesson is to order the largest quantity you can realistically use before the artwork or the product changes, because the tooling is already paid for and the marginal cost of more cartons on the same run is low. It is also why reprinting a carton you have run before is far cheaper than the first order: the die exists, so you are paying mostly for board and press time. If you expect to iterate on the design, that is an argument for locking the structure and the dieline first, then treating graphics as the thing you revise.
What to hand your printer
To get a clean first proof, give the printer a print-ready file built on their dieline, with artwork on its own layer over the structural template, all fonts outlined or supplied, images at full resolution, and the color built in the process the job will actually print in. Include the 0.125-inch bleed on every edge, keep critical elements inside the safe area, and specify the board caliper, the coating, and any finishing up front so nothing is assumed. When the file describes the box as it will really be cut and folded, the proof comes back matching what you pictured, and the order moves to press instead of back to your inbox.
Leave a Reply